


In This Article
Welcome to the Delivered Social Instagram course! We will take you through everything you need to know about Instagram and how to grow your accounts like never before. In this post, we will cover all the basics. Interested? Keep reading!
In this course we will talk about how to create an Instagram account, choosing your username to the most advanced aspects of Instagram marketing – Hold on tight!
In this chapter we will get to know and discuss the following:
Feel free to skip ahead if you want to learn about any section in particular!
- Setting up an account
- Choosing the perfect username
- Picking the perfect profile picture
- How to write an attractive bio
- Tracking your bio link
- Your account settings
- The importance of a landing page
- Instagram blocks and security checks
- Actions you can do on Instagram
Once you finish this course, you will be equipped with all the knowledge you need to kick-start your Instagram account that will gain those followers and really get them to engage with you, as well as helping you understand the complex matters of the Instagram world.
Setting up your account
If you already have an Instagram account and know how to set one up, feel free to skip this lesson. But, you might just pick up some tips you’ve not heard before!
Get your phone and let’s get started. Instagram recently allowed people to create their accounts online in a web browser, but it is much easier to do on your phone. Please be aware that you will need a phone with one of the following: IOS phone, Android or Windows 9 or later.
The first step is to open the App Store and search for Instagram and click install.
Once the app is installed, open it up and click “create account’’. When you create an account you have two options:
- Create an account using your email.
- Create an account using your Facebook account.

It’s best to create your Instagram account using your email, as we will connect the Instagram account to your Facebook later on.
It’s important that you use your main email address so you get all the notifications relating to Instagram sent there for easy access. Go ahead and click ‘’sign up with email or phone number’’ and choose ‘’email’’, and then enter your email address in the provided field and click next.
When that is done, you will need to enter your name, which will also act as your username for the time being, and your password.
Don’t worry too much about your username and full name, as they can be changed at any time. Just add your name and make sure you pick a hard to crack password as people are looking to steal Instagram accounts. A generic password like Password123 will be easier to hack into. But, it also needs to be a password you will remember.
Click “next’’ and your Instagram is now ready! Congratulations!
Now shall we see how to tweak your account to make it look perfect?
[code_snippet id=6]
Choosing the right username
Choosing the perfect username is one of the most important things to do! If you want to know why then keep on reading!
First things first, think about what kind of account you’re going to create and maintain, so you can decide a username that best fits your profile.
What do I mean by what kind of account, because aren’t all accounts the same? Think of it this way, yes all accounts are created the same way, but they’re different in terms of what you post, which can make a huge difference to the type of audience they attract. So, why not write down all your ideas of what you’re going to post on your Instagram feed.
Here are 4 kinds of accounts on Instagram that you might want to create:
- Branded or business accounts – They belong to a brand and they only post about their business. For example, Nike or Adidas.
- Personal branded accounts – This account is still a brand, but is only about one person. For example Justin Bieber, Lewis Capaldi or any other artist, movie star etc.
- Fanpages – This account only posts about a niche or a certain topic of interest. For example, an account created to support a football team, an artist or a model.
- Personal account – This is your own and private account. You decide what is posted and it’s kept to your personal interests- not usually a business.
It makes sense NOT to create a personal one if you’re setting your account up for your business. So, pick one of the others that best suit your business.

Dos when picking a username
- Make it as unique as possible. Stand out from the crowd.
- Pick something easy to remember.
- It needs to be easy to spell so everyone can spell it, even your 10-year-old niece.
- Keep it short and simple. The longer it gets, the harder it is to remember.
- Keep it relevant to your business. Choose your exact business name if it’s available to keep things as easy for your followers as possible.
Don’ts when picking a username
- Don’t even consider using underscores – They’re hard to find on the keyboard and they just don’t look good.
- You shouldn’t EVER copy someone else’s username – It will just create confusion and make you look bad in the long run.
- Don’t put random numbers at the end or front of the username.
- Using repeating numbers, letters or symbols is not a good idea.
- Don’t choose rude or offensive words.
- Using trends is not ideal either, because trends change fast and all the time- you don’t want to get left behind!
With all this new knowledge of how to choose the perfect username, go ahead and pick one that fits your account. It can be quite a challenge to find just the right username, it takes time but with some great imagination you will find it! An important thing to remember when choosing the perfect username for your Instagram account is to use the same username across all your social media platforms if you can. This will make your brand consistent and easily recognisable, which can only be a good thing!
Picking the perfect profile picture
Your profile picture is the first thing that people see when they visit your account – So it’s important to make a good first impression.
Keep in mind, when you AREN’T promoting a brand with a logo always use your face for your profile. But why? We remember faces because we recognize faces better than anything else. Plus, you want it to be recognisably you! So, here’s what to do:
If you have a logo for your business, use it and make it fit in a perfectly round shape as Instagram automatically removes the corners. If you don’t have a logo just use your face!
Let’s look at some quick tips to make your profile picture stand out and be just like you want it:
- Show your face and don’t hide it. If you show it, show it properly- don’t hide. It makes your profile much more reliable and personal.
- Choose a nice outfit. Personalise your picture with a nice outfit that matches your profession or the vibe you want to give out.
- Go for a good background! Your background should never be a distraction from your face. Keep it simple and natural for the best effect.
- Good lighting! Always think about the lighting. Don’t go too light or too dark. Take a couple of pictures in different lights and see what looks best.
- If you want to and can afford it, why not seek help from a professional photographer? When hiring a professional, you know it’s going to be perfect with the right lighting and angles.
- Show us that smile! Be comfortable and do your best smile. Make sure it doesn’t look fake or forced if possible.
- The angles! Try different angles to see what works best for you, just make sure not to hide your face.
- Crop your picture. The Instagram profile picture is very small so crop your picture so it looks good and your face is in focus in the frame.
- Props! Using props is a great way to make sure the picture fits your profession or business. Perhaps stand next to it or make it visible in your picture but don’t let it steal your focus.
Make sure to tick off all the ones above and your profile picture will be perfect. This will leave a positive first impression on anyone who sees it.
How to write an attractive bio
The bio is one of the first things people see when they visit your profile which will either make them stay or leave your profile quite quickly. Let’s take a look at how to create an attractive bio.
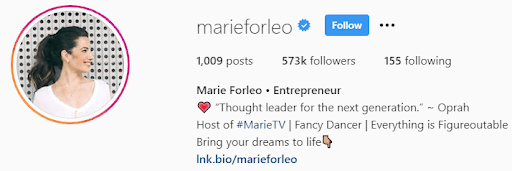
Let’s start off with the name field. No this isn’t your username, but your actual name. Simply just type in your name, and don’t use any nicknames. The name field can hold up to 30 characters, so either go with your name or use your businesses name. It’s also very important that you include 1-2 keywords that best describe your business and what you do.
It is so important because the name and username are the only fields that Instagram considers in search queries – So be wise about your keywords. Basically choose keywords you want to be found by.
There are no rules as to what to write in your name field, you can be spontaneous and go with a funny name if that best reflects your business. However, just always keep in mind that you want to stand out.
Let’s look at some examples:
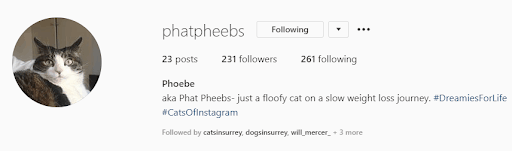
You may think that this profile is not ideal or is the complete opposite of what we’ve just told you to do – BUT just focus on the name. The username tells what the Instagram profile is about and Phoebe is the name of the cat, as simple as that.
Now a little recap for your Instagram name:
- Use the full 30 characters if you can
- Be creative and try to stand out- but stay relevant to what you do
- Use 1-2 keywords if you have room
On to the actual description. The description allows you to write up to 150 characters.
So what do I write in my bio?
These are just a few tips on what to include in your bio:
- 1-2 targeted keywords (what you want to be found by)
- What your account is about
- A call to action
- Hashtags (about your business, what your profile is about etc)
- If your profile is about selling yourself, include your skills (though only for personal branded profiles)
- Contact information (phone number, email or address)
What do all those things mean?
What your account is about: This is basically you explaining what your business is and what you do. Make it short and simple, don’t leave the visitor hanging with lots of questions about what your profile is really about.
A great tip is to include anything that makes you different from any other business out there. Maybe you sell something extraordinary or you have a unique set of skills or experiences. Share as much and as many facts about your business as possible within those 150 characters.
When people visit your profile they should immediately know and understand who you are and what you do.
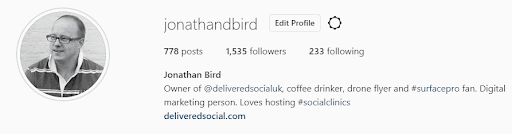
A great example of a bio:
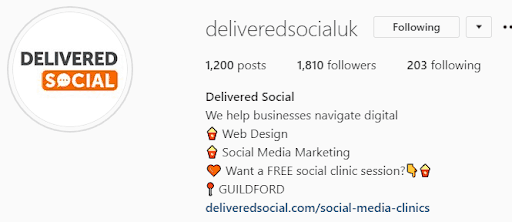
You know who Delivered Social are, what we do, where we are located and we’ve got a call to action link!
A call to action
If you want your visitors to do something special, tell them to do it! You can’t expect your visitors to magically visit your website if you don’t tell them to.
When you add a call to action you make sure that you’re taking the full advantage of your traffic and make your profile as perfect as possible.
What you choose as your CTA (call to action) is completely up to you. You can ask them to visit your website by telling them to click the link in your bio, increase engagements on your posts by asking them to follow or post with a branded hashtag or ask them to sign up to your newsletter. There are lots of ideas on how to create a CTA.
What you need to ask yourself is what would be most effective for your marketing?
A great tip is to combine your CTA with a free present. This could be a free product or a free ebook – Only do this is it’s suitable for your business and your business goals.
Take another look at our bio- you can see that we offer FREE social clinic sessions straight away!
Targeted keywords in your bio
Using targeted keywords will help your followers connect with you more easily. And, it will make it clear what your business is about.
Don’t go too wild with the keywords because no one wants to read a long list of just keywords. The ideal bio includes 1-2 keywords, and there are two ways of how to do it:
- Choose keywords that describe your businesses values
- Choose keywords that describe your audience.
We suggest you go with the second one but make sure you create a profile of your ideal audience before you pick your keywords. Do your research!
A piece of great advice is to put yourself in their shoes and see what they’re looking for, what are their interests, what do they do and what would they want to see, and lastly, how do you make them take action and respond?
Again, look at the Delivered Social bio for an example of this. Our keywords would be web design, social media marketing and Guildford.
Using branded hashtags
This is a great way to engage with your audience on your account. Branded hashtags are a way to inspire other people to tag their posts about your brand with your branded hashtag.
The hashtags you put in your bio are clickable on the web version but NOT on the phone.
If you have more than one account that is relevant to your business, a great tip would be to put your other handle in your bio. If people like your profile, they will be more likely to see what else you’re doing on your other account, which then means you can grow not only one but both of your accounts. Since the handle is clickable, you can link to any other account – though the people behind that Instagram account need to accept the invitation otherwise the handle won’t be clickable. So you can’t necessarily link to just any old account.
Products and skills for branded accounts
Are you trying to sell? Make your products stand out and tell people why they should buy your products and not your competitors.
Everyone wants to be known for a particular service, hobby, profession, or some cool skills, so make sure to include these details about you in your Instagram bio.
Contact information
You might have a link so people can contact you, but it’s super important to also include your other contact details in the bio. This makes things very simple for anyone wanting to get in touch. Here are a few examples of what you can include:
- Your email address
- Location
- Hours of operation
How to put everything together
Creating the perfect bio can be very difficult, but once you’ve put all the information above in, you will be good to go! If you can’t fit everything in it, make sure to add as much as possible while still making sure it looks good.
These are some ideas on how to make your bio look good:
- Bullet points: It’s quicker and easier to understand and read your bio with these. This can only be done correctly on the web version. So, f you do it on your phone you need to write the whole text in a text editor and copy-paste it. Even the notes app on your phone will work!

- Use emojis: It makes your bio easier to read. You can use them combined with the bullet points or just simply add them in between the text.
This is all you need to know about creating the perfect bio for your Instagram profile. Add all the information mentioned above and you will come up with an eye-catching bio.
Extra bio options for your business
If you have an Instagram account for your business there are a few more options available for you, which is a really good idea to use.
So if you have a business account you will get access to analytics for your account, Instagram ads and more options for your bio.
The category option
Once you go on your business account a category field will appear underneath your company’s name. It’s the same category that appears on your Facebook page linked to this profile. If you don’t want this, you will need to change it from your Facebook page.
All this does is give you extra bio space which you can put to better use.
When you add your email in the email field a button will be created on your profile, which visitors can click and easily send you an email. Visitors no longer need to copy-paste it. This also saves extra space in your bio, so we recommend using it.
Call
When you add your phone number a button will be created, and when someone presses the button it will prompt them to call you. So we only recommend this for businesses who actually have someone to pick up the phone and call back 24/7. The button will appear along with the email button underneath all the information in your profile.
All 3 buttons are at the bottom of your profile. As a result, this saves up a lot of bio space.
Swipe up link in Instagram Stories
Firstly, bear in mind this can only be done if you have more than 10,000 followers. If you don’t, feel free to skip this part.
With this option, you will be able to include swipe up links in your Instagram stories. This tool is very powerful since most Instagram profiles only have one clickable link in their profile – This could take your Instagram marketing to a whole other level!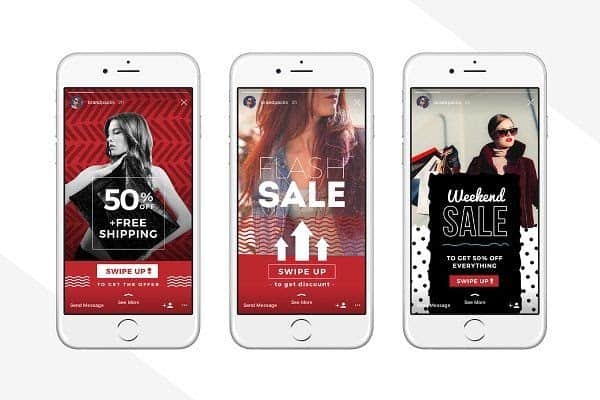
See the ‘’see more’’? If the visitor swipes up they will be taken off of your Instagram account and to whatever you link to. This could be your website or a specific landing page.
What you should know about this feature is that it’s only visible on the mobile version and a lot of people don’t really know about swipe up stories so always try to tell them in the caption what you want them to do – SWIPE UP!
Bio link best practices
First things first, you only get to have one clickable link in your bio. If you add links to your post they won’t be clickable and if people want to know more about the link they will have to manually write it in their browser – So we suggest you don’t put links in your bio because people like what is quick and easy and the engagement will then be very very low.
What you put in your bio as the clickable link is VERY important and you really need to consider and think about what that link should be. This is because your link will drive the most traffic to where you want them to go.
Again, if you are a business account your profile can have a few more links like the contact, email and phone button.
How do I then drive traffic to my bio link so it’s not a waste?
Simple and easy, make it interesting and straight to the point. This means that linking to your home page on your website is great, but then you need to trust the visitor to find what they’re looking for. They will probably give up, because as said previously, people want everything to be quick and easy. We suggest you link to a specific landing page which will take them directly to what they’re most likely to be looking for.
If you need to create a new landing page in order to give your audience what they need, here are a few sites you can create:
- Contest or giveaway page: Who doesn’t love a competition? It doesn’t matter what they win or if they need it – They will likely click the link to enter.
- Targeted blog posts: This is an opportunity for you to switch up your links in your bio to keep it fresh, new and interesting.
- Freebie: This is something that really boosts your engagement on your account. Though be sure you can deliver before you use this!
- Targeted video: As you might know by now, video can definitely take your marketing game to a whole new level. Videos grab people’s attention a lot faster than a landing page.
- Targeted landing page: This is great for all the purposes you have in store for your business.
- Newsletter/email sign up form: Finally, creating an email list will make it easier and quicker for you to sell and resell.
How to make your link look good
- Keep your URL small. There are many URL shortener websites so this is easy to do. We suggest you use this one: www.shorturl.at
- Put different links in your bio from time to time to keep it interesting and fresh. Don’t forget to post about your new link to drive people to click it!
Tracking your bio link
Tracking your Instagram activity and traffic is very important because it allows you to know how effective your strategies are and what changes you need to implement to make it better.
There are many ways to track your bio link:
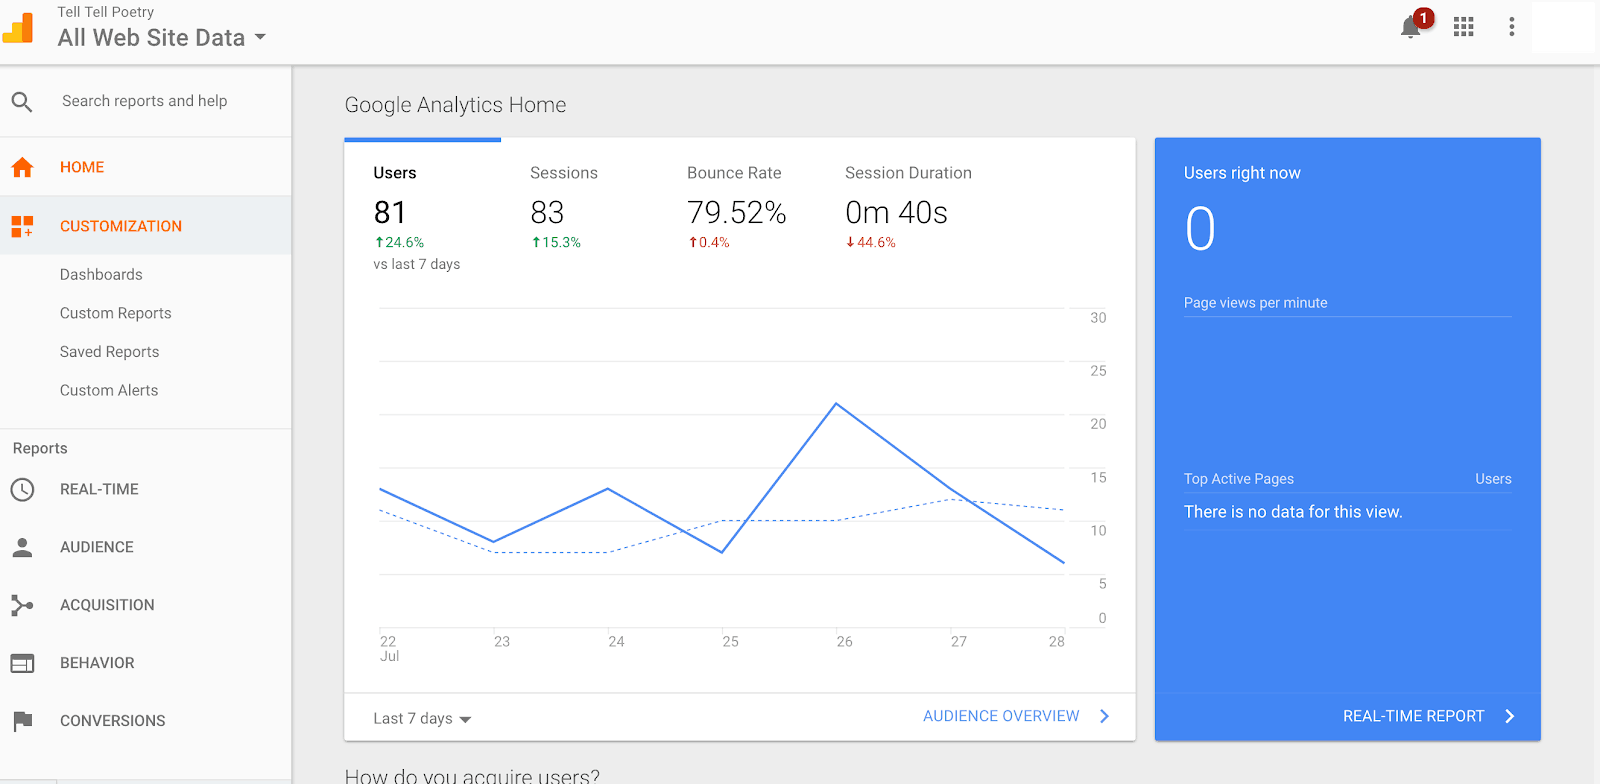
- Google Analytics: If your link is a link to your website, we recommend adding it to Google Analytics. They have lots of reports that you can run on your traffic.

- URL shortener: We recommend Bit.ly. They have analytics for all shortened links. First, you need to create a free account and then shorten your link, which will then be kept in your account and you will have access to their analytics. This is not only nice and easy but will also make your bio look great.
- Cloaker tool: If you have a WordPress blog you can use a cloaking tool. This is frequently used to hide links and make URL display nicer and more memorable. If you want to use a Cloaker tool, all you have to do is use it on the links you want to add to your bio, and all clicks will be tracked.
- Affiliate system: Finally, install an affiliate system on your website, create an affiliate ID and use that URL as your link in your bio. This isn’t a method we recommend, but if you have no other option this is fine to use.
So, these are the most common ways to track your Instagram bio link traffic. It’s up to you whichever method you choose to use, but we recommend at least one of the methods. Once you are all set and ready to go you should do tests to see if something needs to be changed.
Your Account Settings
Next up, we’re going to take a closer look at your account’s settings. These are all very easy and basic settings that you should know and how to change them for the better.
Go to your profile and click on the settings icon. It may be hidden in the section accessed by clicking the three horizontal lines in the top right of your profile.
From there you have a lot of access to a lot of settings for your account. Let’s break them down one by one to see what they’re for and what they can do:
- Invite friends: You can invite friends to follow your Instagram account. This setting is to help you grow your account and find friends fast. This is mostly for personal accounts as you might not necessarily want all your Facebook friends to follow your business account – If you do, go ahead!
- Follow people: This is used when you just want to follow someone and see what they’re about, and not make them friends.
Instagram is about connecting with other people, hence why they make sure this is the first thing you do so they grow your account.
This is what each and every category means:
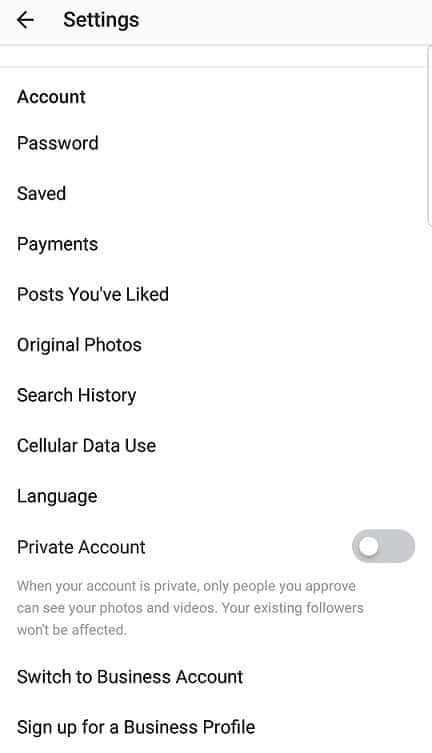
Firstly, Account settings: This is the main setting.
Password: You can change your password.
Saved: Save photos and videos. It’s a private place and no one else can see what you’ve saved. You can also create collections or albums.
Payments: If you add your CC and shop on Instagram it will all be visible here.
Posts you’ve liked: You can basically see everything you’ve ever liked.
Original photos: It tells Instagram what to do with the photos you take and edit them.
Search history: You can see what you’ve searched, whether that’s a location, hashtags or accounts.
Cellular data use: This is only relevant in case Internet data.
Language: You can change the language.
Private account: You can make your account private or public. When your account is private it allows only your followers to see what you post, whereas if it’s public everyone can see your profile and what you post.
Switch to Business account & sign up for a business profile: Pretty self-explanatory. You can switch to a business account to have access to the previously mentioned tools and options.
Now, let’s jump onto the privacy and security section. This gives you control over what you share and with whom.
This is what each and every category means:
Firstly, Account privacy: It’s completely the same as the private account above.
Blocked accounts: You can see all the accounts you’ve blocked. If you want to unblock someone you can do it from here.
Activity status: Profiles you follow and people you talk to via DMS can see when you were last online if this is enabled.
Resharing to stories: This allows other people to share your stories to their stories. This will get you more engagement and exposure to your account as your username will appear.
Story controls: You can hide stories from certain people and you can allow DM replies to everyone.
Comment controls: You can control the comments you get, allow comments from everyone, people you follow and you can block comments from certain people. You can also set up automatic or manual filter of bad words in the comments.
Photos of you: You can allow tagged photos to be visible or not on your account. But, you can always enable and disable it.
Linked accounts: So this is where you will find all linked accounts like Facebook and Twitter. In this setting, you can also set up linking.
Account data: It keeps your account data. To see the details you need to re-login.
Two-factor authentication: This double checks if it’s you whenever you sign in. You will receive a code on your phone.
Data download: Here you can download a copy of everything you’ve ever shared on Instagram.
Contacts syncing: Turn this off if you don’t want all your contacts from your phone to find your account.
Privacy and security help: In here you will find everything all options and you can set them up exactly as you want them.
Let’s look at the last options, notifications, support, about and login. 
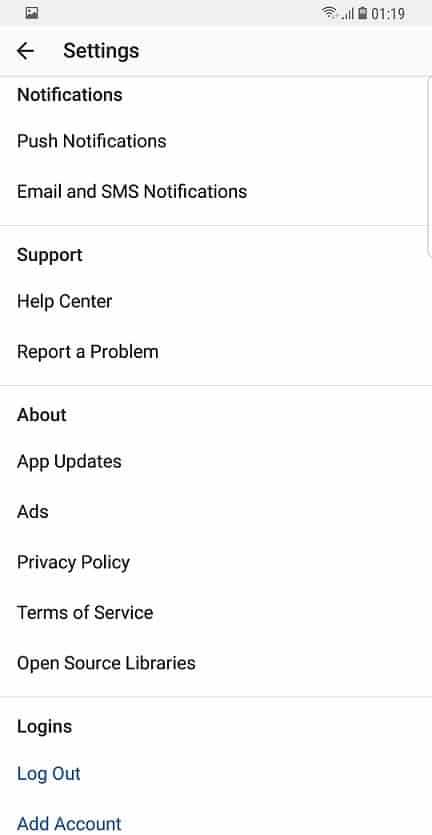
Notifications: In here you can enable or disable push, email and SMS notifications.
Support: If you ever need help go to the help centre and report a problem. It is a way to contact Instagram with serious issues like account stealing. Bear in mind it will take quite some time before they respond.
About: This is the setting for app updates, ads, privacy policy, terms of service and open source libraries.
Finally, Logins: Here you can log out of your account and add another one. The maximum is 5 different accounts.
The Instagram app has a lot of settings that you can use to make your account just like you want it. These settings are for normal accounts, as business accounts have a few extra settings.
The importance of a landing page
A lot of people tend to avoid this step because they think it’s too complicated and not worth it.
If you want to step up your Instagram marketing game this is essential for you. Yes, it might be a bit complicated but so are a lot of things in life. You can pay for a course to learn how to or follow our basic advice.
First question, what is a landing page? A landing page is a page on your website created with one goal, which could be signing up to a newsletter or buying something. Just make sure your page has ONE goal.
So if directing your visitors to your main website will give them too many choices of what to do and they might just click away from your website again because it takes too much time. Sending them to a landing page tells them exactly what to do.
So keep in mind that:
- Instagram is a mobile-oriented platform, so your landing page has to be properly optimized for mobiles as well as laptops.
- Mobile screens are way smaller, so your landing page does not have to be full of fancy elements and information. Keep it simple.
Before you create your landing page, decide what you want your landing page to achieve. It all depends on what your profession is and what you want to accomplish on Instagram.
Let’s look at some examples:
- Recent blog posts: Create your own page with your blog posts if that’s how you want to get your reader’s attention.
- Newsletter signup: If you want to create an email list, then you should create a signup landing page. A good tip is to offer them something for when they sign up.
- New or hot products: Are you promoting your shop, you should create a landing page with all your new products. The landing page MUST include high-quality photos and good descriptions.
- Contact form: Create a contact form if you’re selling products or services via your Instagram account. Keep it simple and don’t add too many fields to the contact form.
- Social media links: If you want to grow your social media platforms, add links to your other accounts and tell them why they should follow you.
Only pick one option from the list above. Remember your landing page should only have one goal and your visitors should only be able to do just that action you told him to do.
Creating your landing page:
- Keep it short and to the point: Your landing page should be skimmable and anyone who visits your page should know within seconds what the page is about.
- Use statistics to strengthen your point: People believe statistics and they are very powerful. Only use statistics that are true.
- Earn your visitor’s trust: No matter what you add on your landing page it needs to be reliable in order to earn trust. Don’t exaggerate or make something up because people will realise. Make sure you’re truthful in everything you say.
- Explain your offer clearly from the start. Concentrate on why your product or service is unique and how it can help the visitor.
- Use images or videos as visual aids. People love everything visual, so add lots of videos and pictures. Keep in mind people have a short attention span, so keep the videos nice and short. The pictures and videos you post must match with the text content, otherwise it makes no sense.
- Call to action: Always remember a CTA. Don’t overdo it, we recommend about 2-3 CTA (it depends on the length of your page).
With all these new tips in mind, you should be ready to create a landing page.
So how do I actually create them?
We recommend you use WordPress which has lots of free plugins, but here are some other platforms you can use that have great tools:
- Leadpages and Clickfunnels: This is a paid service that allows you to create your landing page fast.
- Beaver Builder: This is a WordPress paid addon that has premade templates.
Though these are just some platforms you can use as there are many more out there, both free and paid services.
Instagram blocks and security checks
Instagram blocks and bans accounts without warning you first. As a result, this happens a lot to block spam accounts. So you just have to be super careful how many actions you do.
Now let’s take a closer look at what happens and how you avoid it:
Action blocks:
This is when you do too much of the same action. This lasts anywhere from hours up to a month! The image below shows how the message looks:
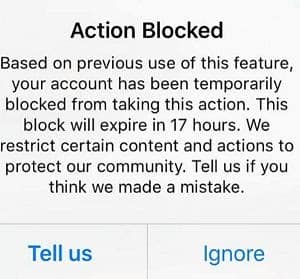
This happens to you if Instagram thinks you do a certain action too much, too many times. That could be liking, following, commenting, unfollowing and sending DMS.
Now it all depends on Instagram’s algorithm and how they see your account. On certain accounts they look at age, usage patterns, number of followers etc.
We also suggest you make your account look as human as possible. This means you do all the actions mentioned above daily and not just one action all day long.
What to do to ensure it happens:
- Firstly, stop all actions for 2-3 days after you get the message. This will allow you to get back into your account as soon as possible.
- Take it super slowly after the ban is lifted. Don’t go overboard with liking, commenting, posting etc – Otherwise it might happen again.
- Finally, be patient.
Disabled account
So this happens if Instagram feels you have violated their community guidelines or terms of use. We recommend you read these.
Yes, everyone breaks the rules sometimes, but it’s ideal that you don’t find yourself in this situation. Instagram can be very cheeky and say you’ve done it and block you immediately, again with no reason and warning.
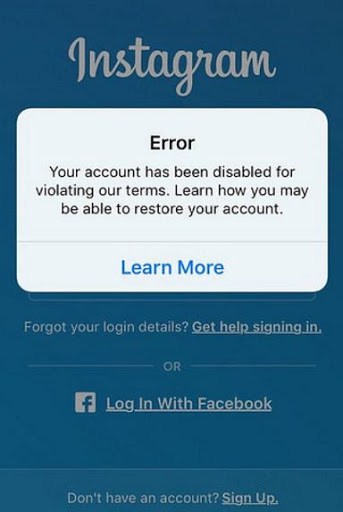
Instagram might tell you in the message that you won’t get your account back, but you can appeal the decision and if that’s done correctly you could get your account back in 9 out of 10 cases.
If you don’t get the ‘’learn more’’ button it’s because there’s either an issue with the login, your account is deleted or Instagram know or think you did something wrong.
If you do have the ‘’learn more’’ button, click it and follow the required steps to get your Instagram account back. Instagram will want a picture of you holding a written paper with your details and the code they have sent you. When this is done and sent over to them, you should have your account back shortly.
It may sound hard to do everything they ask, but don’t worry. The picture will be deleted afterwards.
If you have more than one account on Instagram, you will need to do this for every single account.
Email or phone verification
This will happen if you log into your account on a different device. Instagram will make you verify you are the owner by asking you for your email address and sending a link for you to verify, or they will make you enter your phone and enter the code you get via SMS.
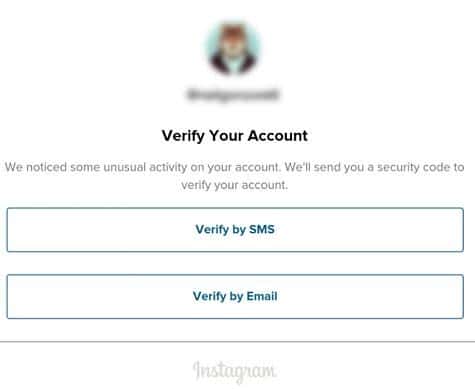
You may not always have both options. What is quite interesting about this is that the email will always be the same, but they let you enter any phone number – All they check is whether you have access to a phone or not.
Bear in mind that this is true at this very moment, but Instagram might change this. We do advise you to use the same phone number every time.
So all you have to do is verify your phone or email. Sometimes this doesn’t work which is called a verification loop. This is when it pops up again after you complete your verification.
There are many opinions as to why this happens. Some say it’s an Instagram bug, however others think it’s a way for Instagram to deal with spam accounts.
If this happens to you there are some things you can try to fix it:
- Wait a few days and try again.
- Change your IP if you’re using one.
- Login from a different device. So switch from your phone to your computer.
Other actions that can cause you problems
- Doing one action too much: Firstly, this can cause blocks and if this keeps happening and you ignore it Instagram might disable the account.
- Excessively frequent publications: Do not post 10+ posts a day from day 1. Take it easy at first.
- Copyright infringement: The first few times your posts are reported Instagram will delete the image and send you an email telling you they deleted it.
- Images that don’t follow the community guidelines: Don’t post anything sexual, violent or inappropriate.
- User complaints: Finally, don’t do something that you know will get complaints from other users. Instagram believes and trusts other users who report any bad behaviour, and they act FAST.
After this lesson, everything might seem scary, but don’t worry. All you have to do is read Instagram’s rules and be aware of what you post. Then, you shouldn’t encounter any issues!
Looking to grow your brand on social media this year? Our latest guide on how to promote business with Instagram Reels in 2025 covers everything you need to know, from strategy and content ideas to common mistakes to avoid.
Actions you can do on Instagram
To use Instagram’s tools to their full potential you need to know everything you can do with them.
This time we won’t go in-depth about each tool they offer, but list them so you can create more engagement and grow your following. Also, keep in mind that these actions have one goal = attract attention to your account!
- Follow and unfollow: Firstly, following other accounts is one of the most used tactics to get attention to your profile. They will get a notification and might check you out and once they see your amazing bio they might follow you back. Remember the follow and unfollow action block. You can’t follow and unfollow more than 7500 people a day. At some point, you will need to unfollow the accounts that don’t follow you back.
- Follow back: We recommend you follow back most accounts while your account is relatively new and small.
- Like: Like other people’s posts to attract attention to your account. You can like posts in your profession, like one post per user, like the latest posts or like a post that has a lot of engagement.
- Comment: So, commenting on someone else’s post is a great way to attract attention to your account. They might like your comment, visit your account and even give you a follow.
- Sending messages: Sending a personal message to other people is a fantastic way to increase engagement. You could send a message to new followers and mention a product or service they’re promoting. Don’t ever sell in your first message.
- Posting stories: Stories are a fun and creative way to engage with your audience. These are great to be used as limited time promotions, contests, shoutouts etc. Again, if you have more than 10.000 followers you can create a swipe up link in your Instagram story.
- Instagram highlights: You can highlight your stories or your lives on your profile. This is great for your business due to the extra links you can use in your stories.
- Posting with hashtags: Hashtags are special pages created by Instagram. They are VERY important as people search on the hashtags they are interested in, so if they find your account it will get a huge boost of followers and engagement. There’s a limit of 30 hashtags per post.
- Posting/commenting with mentions: Mentioning or tagging people in posts are a great way to attract someone’s attention to your profile.
- Double-tapping: This is a quick and easy feature Instagram has. If you double-tap on your screen it will like the post. You can do a post saying “double tap if you agree’’. As a result, this creates engagement.
- F4F, L4L and S4S: They stand for follow for follow, like for like and shoutout for shoutout. These are all great tactics to get more followers, get more likes and attract attention to your profile via shoutouts.
- Using engagement groups or pods: This is basically joining a group of people. Everyone makes a post and everyone likes, comments and engage with that. This will make more people will visit your profile. However, be aware that some people see this as ingenuine engagement.
- Saving your posts: When running more than one Instagram account you can set them up to save each other’s posts. Instagram considers posts that get a lot of saves very important and ranks them higher on the hashtags top page.
To sum it all up, watch our YouTube video on 3 ways to improve your Instagram strategy:
So there we have it! You’ve finished part one of our Instagram guide! If you’ve got this far, then congratulations. We hope that you’ve learned something and found it helpful. There are so many things you can do on Instagram to increase your accounts engagement. It’s great if you can combine a couple of the above in smart ways which will then increase your engagement even further. Look out for the next installment of this guide to learn even more about Instagram and the ways you can use it to market your business to its full potential!
If you’d like some face-to-face Instagram guidance and advice, we’d love to see you in our Guildford office for one of our FREE Social Clinics! We can cover all the basics you need to know for a successful online presence. Interested? Why not book in a time that suits you today?!